Конфігурація SD карти
This page is for preparing your SD card for your device. In the process, we'll format the SD card and check the card for errors.
DANGER
Make sure to backup your SD card contents BEFORE following this. Your SD card will be WIPED in the process.
Section I - Formatting your SD card with SD Formatter
TIP
This section formats the SD card to the specifications by the SD Card Association. This can fix many issues that may occur with running homebrew applications.
DANGER
Any 64GB or larger SD cards will be formatted to exFAT in this process. You must follow both Sections I & II to re-format to FAT32.
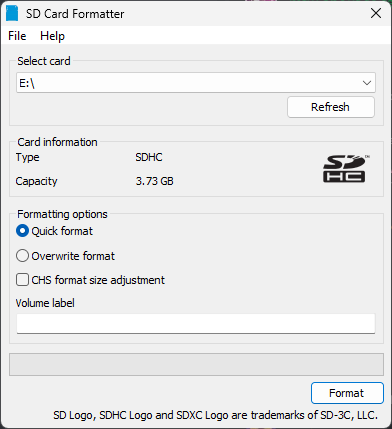
- Download the latest version of SD Formatter
- If the above link doesn't work for you, download from archive.org
- Accept the End User License Agreement to start the download
- Run
SD Card Formatter Setup(the.exefile) in the downloaded.zipfile with Adminstrator privileges, then install the program - Run
SD Card Formatterfrom the Start Menu with Adminstrator privileges - Select your SD card
- Make sure the
Quick Formatcheck box is checked - Press
Formatto start the format process- If you're using a 4GB-32GB SD card, and the cluster size is not reported as
32 kilobytes, you'll need to follow Section II as well
- If you're using a 4GB-32GB SD card, and the cluster size is not reported as
Section II - Formatting your SD card with GUIFormat
This section formats SD cards which are 64GB or larger to FAT32.
This also applies to 4GB-32GB SD cards which have not been formatted with 32kb cluster size.
TIP
If your SD card is 32GB or less in capacity, skip to Section III.
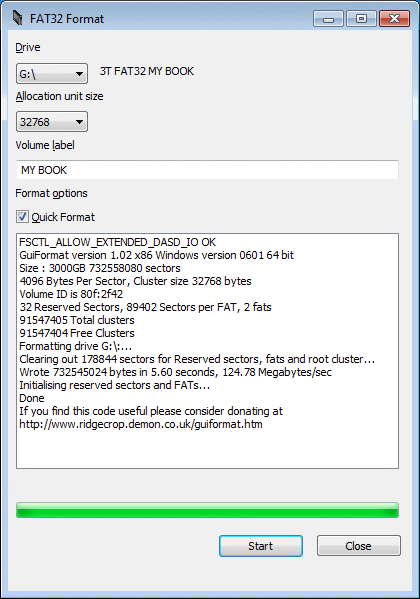
- Download the latest version of GUIFormat
- Click on the picture on the website to download the app
- Run GUIFormat with Administrator permissions
- Select your drive letter
- Set the
Allocation size unitto32768- If this is too large for your SD, set it to the highest one that works
- Make sure the
Quick Formatcheck box is checked - Start the format process

Section III - Checking for errors
- Go to the properties window of your SD card
Windows Explorer->This PC-> Right click your SD card ->Properties
- In the tools tab, Select
Check Now - Check both
Automatically fix file system errorsandScan for and attempt recovery of bad sectors - Start the checking process
This will scan the SD card and correct any errors it finds.
Section IV - Checking SD card read/write
- Download and extract the h2testw archive anywhere on your computer
- If the above link doesn't work for you, download from archive.org
- It can also be extracted on an external device as long as that external device isn't your SD card
- With your SD card inserted into your computer, run
h2testw.exe - Select which language you'd like to see h2testw in
- Set your SD card's drive letter as your target
- Ensure
all available spaceis selected - Click
Write + Verify
- Wait until the process is completed
TIP
If the test shows the result Test finished without errors, your SD card is healthy and you can delete all .h2w files on your SD card.
DANGER
If the test shows any other results, your SD card may be corrupted or damaged and you may have to replace it!
TIP
If TWiLight Menu++ fails to start after following this method, please follow the Windows method instead, by either rebooting to Windows or running a Windows Virtual Machine
Section I - Formatting your SD card
- Make sure your SD card is not inserted into your Linux machine
- Launch the Linux Terminal
- Type
watch "lsblk" - Insert your SD card into your Linux machine
- Observe the output. It should match something like this:
NAME        MAJ:MIN RM   SIZE RO TYPE MOUNTPOINT
mmcblk0     179:0    0   3,8G  0 disk
└─mmcblk0p1 179:1 0 3,7G 0 part /run/media/user/FFFF-FFFF- Take note of the device name. In our example above, it was
mmcblk0p1- If
ROis set to 1, make sure the lock switch is not slid down - Make sure you're targetting the partition,
mmcblk0p1notmmcblk0
- If
- Hit CTRL + C to exit the menu
- Follow the instructions relevant to your SD card's capacity:
- 2GB or lower:
sudo mkdosfs /dev/(device name from above) -s 64 -F 16- This creates a single FAT16 partition with 32 KB cluster size on the SD card
- 4GB or higher:
sudo mkdosfs /dev/(device name from above) -s 64 -F 32- This creates a single FAT32 partition with 32 KB cluster size on the SD card
- 2GB or lower:
TIP
If you get an error message saying: mkdosfs: /dev/(device name) contains a mounted file system, you will need to sudo umount /dev/(device name from above) in order to complete the above step. You should then reinsert the SD card or recreate the MOUNTPOINT (sudo mkdir -p /run/media/user/FFFF-FFFF && sudo mount /dev/(device name) /run/media/user/FFFF-FFFF) to continue.
Section II - Using F3
- Download and extract the F3 archive anywhere on your computer.
- Launch the terminal in the F3 directory
- Run
maketo compile F3 - With your SD card inserted and mounted, run
./f3write <your sd card mount point>- Wait until the process is complete. See below for an example output:
$ ./f3write /media/michel/6135-3363/ Free space: 29.71 GB Creating file 1.h2w ... OK! ... Creating file 30.h2w ... OK! Free space: 0.00 Byte Average Writing speed: 4.90 MB/s - Run
./f3read <your sd card mount point>
- Wait until the process is complete. See below for an example output:
$ ./f3read /media/michel/6135-3363/
                  SECTORS      ok/corrupted/changed/overwritten
Validating file 1.h2w ... 2097152/        0/      0/      0
...
Validating file 30.h2w ... 1491904/        0/      0/      0

   Data OK: 29.71 GB (62309312 sectors)
Data LOST: 0.00 Byte (0 sectors)
            Corrupted: 0.00 Byte (0 sectors)
   Slightly changed: 0.00 Byte (0 sectors)
         Overwritten: 0.00 Byte (0 sectors)
Average Reading speed: 9.42 MB/s
TIP
If the test shows the result Data LOST: 0.00 Byte (0 sectors) your SD card is healthy and you can delete all .h2w files on your SD card.
DANGER
If the test shows any other results, your SD card may be corrupted or damaged and you may have to replace it!
Section I - Formatting your SD card with SD Formatter
TIP
This section formats the SD card to the specifications by the SD Card Association. This can fix many issues that may occur with running homebrew applications.
DANGER
Any 64GB or larger SD cards will be formatted to exFAT in this process. You must follow Section II to re-format to FAT32.
- Download the latest version of SD Formatter
- Accept the End User License Agreement to start the download
- Run
Install SD Card Formatter(the.mpkgfile) in the downloaded.zipfile - Run
SD Card Formatter - Select your SD card
- Make sure the
Quick Formatcheck box is checked - Start the format process
Section II - Formatting your SD card with Disk Utility
This section formats SD cards larger than 32GB to FAT32.
TIP
If your SD card is 32GB or less in capacity, skip to Section III.
OS X El Capitan (10.11) and later
- Launch the Disk Utility application
- Select
Show All Devicesin the top-leftViewpanel - Select your SD card from the sidebar
- Make sure you choose the correct device, otherwise you might accidentally erase the wrong drive!
- Click
Eraseat the top - Ensure that
Formatis set toMS-DOS (FAT32)- On El Capitan (10.11) through Catalina (10.15) choose
MS-DOS (FAT)
- On El Capitan (10.11) through Catalina (10.15) choose
- Ensure that
Schemeis set toMaster Boot Record- If
Schemedoes not appear, clickCanceland make sure to choose the device instead of a volume
- If
- Click
Erase, then clickClose
OS X Yosemite (10.10) and earlier
- Launch the Disk Utility application
- Select your SD card from the sidebar
- Make sure you choose the correct device, otherwise you might accidentally erase the wrong drive!
- Click
Partitionat the top- If
Partitiondoes not appear, make sure to choose the device instead of a volume
- If
- Ensure that
Partition Layoutis set to1 Partition - Ensure that
Formatis set toMS-DOS (FAT) - From the Options button (below the partition table), select
Master Boot Record. - Click
OK->Apply->Partition
Section III - Using F3
- Open Terminal
- Install F3 from brew by running
brew install f3- If you don't have brew, install it with the instructions on brew.sh
- With your SD card inserted and mounted, run
f3write <your sd card mount point>- Wait until the process is complete. See below for an example output:
$ f3write /Volumes/SD\ CARD Free space: 29.71 GB Creating file 1.h2w ... OK! ... Creating file 30.h2w ... OK! Free space: 0.00 Byte Average Writing speed: 4.90 MB/s - Run
f3read <your sd card mount point>- Wait until the process is complete. See below for an example output:
$ f3read /Volumes/SD\ CARD
                  SECTORS      ok/corrupted/changed/overwritten
Validating file 1.h2w ... 2097152/        0/      0/      0
...
Validating file 30.h2w ... 1491904/        0/      0/      0

   Data OK: 29.71 GB (62309312 sectors)
Data LOST: 0.00 Byte (0 sectors)
            Corrupted: 0.00 Byte (0 sectors)
   Slightly changed: 0.00 Byte (0 sectors)
         Overwritten: 0.00 Byte (0 sectors)
Average Reading speed: 9.42 MB/s
TIP
If the test shows the result Data LOST: 0.00 Byte (0 sectors) your SD card is healthy and you can delete all .h2w files on your SD card.
DANGER
If the test shows any other results, your SD card may be corrupted or damaged and you may have to replace it!
TIP
You can now restore the contents of your SD card and continue.